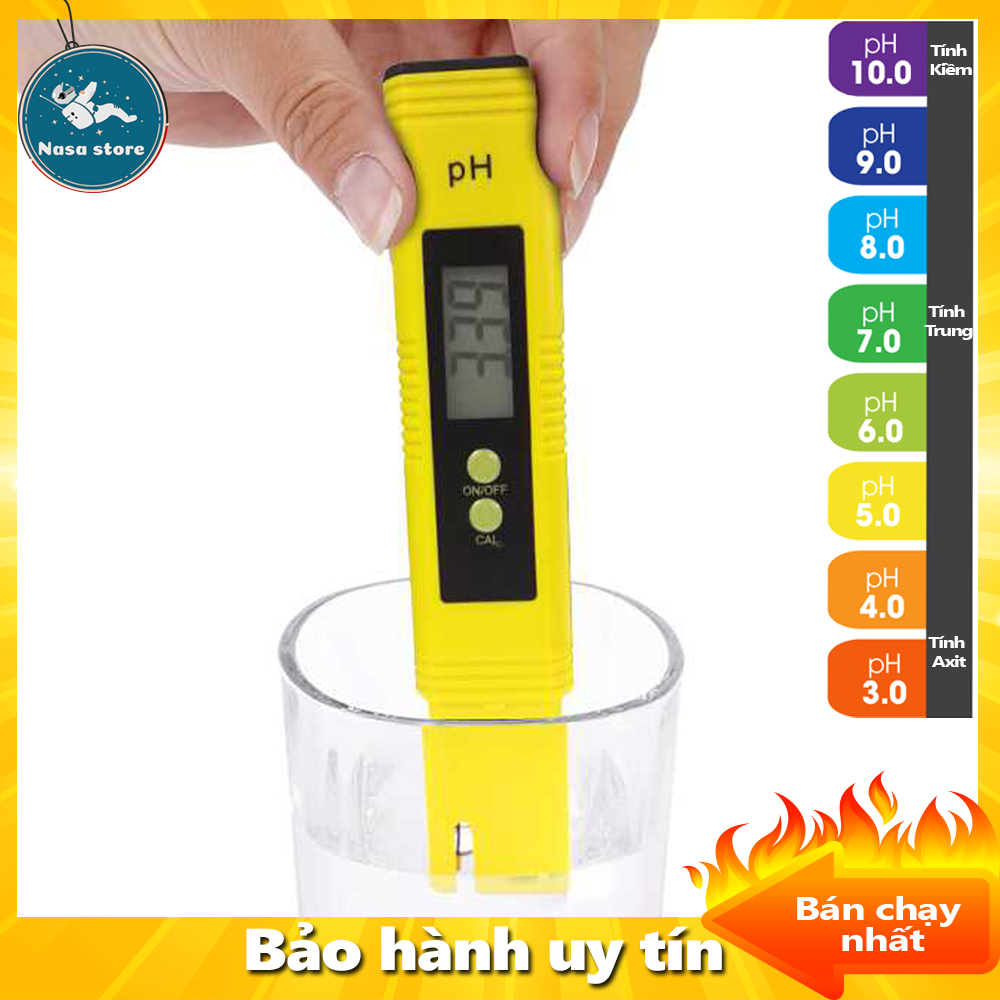
Đến nơi bán
Đến nơi bán
Đến nơi bán

Đến nơi bán

Đến nơi bán

Đến nơi bán
Xem thêm 6 nơi bán khác
Tìm kiếm tương tự
Đến nơi bán
Đến nơi bán
Đến nơi bán
Đến nơi bán
Đến nơi bán
Đến nơi bán
Xem thêm 6 nơi bán khác
Tính năng:
100% Thương Hiệu mới và chất lượng
Lắp đặt dễ dàng, chỉ cần cắm vào CHUẨN giao tiếp PCI
Kích nguồn khởi động máy tính của bạn và kiểm tra card
Hệ thập lục Phân hiển thị trên Màn hình
2 ĐÈN LED hiển thị
Kiểm tra hiển thị:
"- Các LED báo nguồn 5V, 12V, 3v3 thường là đầy đủ, chỉ thếu khi ta cắm card không tiếp xúc tốt mà thôi. <– Kết luận bộ nguồn ATX đủ.
- LED CLK: phải sáng <– Có xung clock. Mất, bị mất xung CLK. Kết luận main hư.
- LED RST: khi bật máy sẽ sáng rồi tắt là OK. Nếu không sáng luôn hoặc sáng hòai –> Mất xung reset –> Main hư. Nếu nó sáng rồi tắt thì bấm thử nút reset nếu nó tiếp tục sáng rồi tắt thì xung reset đã OK.
Quan sát các LED chức năng xong thì tiếp theo là theo dõi các LED 7 đoạn (LED hiện số):
- Nếu không hiện gì: Main + CPU chưa chạy, hoặc card test đểu không support. CPU tốt thì lỗi main.
- Nếu hiện ngay FF hoặc C0: vẫn như trên: Main + CPU chưa chạy, hoặc card test đểu không support. CPU tốt thì lỗi main.
- Nếu nhảy C0, C1 hoặc D0, D1: Lỗi này cũng do main và CPU chưa chạy, nhưng có thể do nguồn cấp cho CPU không ổn hoặc main không support CPU.
- Nếu card test báo lung tung (tắt mở lại thì báo lỗi khác) đa phần do lỗi BIOS hoặc card test đểu xuất code là Rác không có ý nghĩa gì.
- Nếu card test báo 26: đa phần là do card test đểu nên hiện lỗi sai. Thường gặp ở main INTEL và GIGABYTE.
- Card test báo 05, D6, C5 (tùy lọai BIOS) thì lỗi là do chính BIOS.
- Card test báo 7F: main đã chạy, đã lên hình, màn hình đang dừng tại thông báo bấm F1 để tiếp tục. Nếu cắm bàn phím rồi, nhấn phím F1 thì card test sẽ nhảy tiếp và báo FF là coi như main OK. Nếu vẫn chưa lên hình thì lỗi là do VGA mà thôi.
Xem thêm
"Motherboard diagnostic card code Daquan
All codes of motherboard diagnostic card
Code: FF, 00, C0, D0, CF, F1 or nothing means that the CPU failed
C1, C6, C3, D3, D4, D6, D8, B0, A7, E1 indicate that the memory is insufficient
24, 25, 26, 01, 0A, 0B, 2A, 2B, 31 indicate that the graphics card is not
Some integrated graphics motherboards 23, 24, 25 indicate that it can be lit normally, some VIA chipsets display 13 to indicate that it can be lit, some motherboards in some brand machines display 0B to indicate normal, and some motherboards display 4E to indicate normal On, the motherboard of some INTEL chipsets displays 26 or 16 to indicate that it can be lit normally.
C1, C6, C3, 01, 02 cycle jumps are mostly caused by bad I/0 or BIOS flashing
If it shows 05, ED, 41, flash BIOS directly
================================================== ============
There are three situations for special codes "00", "FF" and other start codes:
1. If "00" or "FF" appears after a series of other codes appear, the motherboard is OK.
2. If there is no error in the CMOS setting, the non-serious fault will not affect the continuation of the BIOS self-check, and eventually "00" or "FF" will appear.
3. If "00" or "FF" or other start codes appear and do not change as soon as the system is turned on, it means that the motherboard is not running.
00 co cf ff d1 are all CPUs not working, check the related circuits and bios for chip selection
c1 c3 c6 a7 e1 are all memory but, check the relevant route
c1-05 cycle jump, clock is bad, bios is bad, south bridge or I/O is bad
c1 c3 c6 memory-bios-northbridge
bo North Bridge is broken
25 AGP power supply, north bridge is broken
Does not light up after 0d Graphics card part
2d Connect the AD line of the AGP, initialize the intr signal, and check the power supply of the North Bridge
It does not light up after displaying 2b. Brush the bios, the clock generator is broken, and the power supply of the north bridge is abnormal or hung up
50 I/O power supply or I/O is broken, south bridge power supply or south bridge is broken, bios is broken
41 Brush bios, A18 jumper. PCB disconnection, I/O, south bridge
If there is a code other than the above code, it is a garbled code, regardless of what he wrote in the manual, first brush the bios and then talk.
These are all summarized in my notes, but after all, some codes are not encountered many times, and there is no guarantee that they are all correct.
To add, if there is a problem with the internal program of bios, the above code may not be established, so if you encounter uncommon code, such as ff, c1, it is best to brush bios first
c0 2a cpu has issued addressing instructions, bios is not working
c1 d3 d4 bo cpu is working, check memory
26 85 8e 7f 4e 42 32 Detect graphics card
c1-05 20 Cycle jump I/O is bad or the interface is faulty
31 Graphics card failure
Combine the character brother's, slowly recite it. . .
If it is Award BISO, the memory self-test has not passed, check the motherboard's memory control circuit and memory slots and memory sticks.
If it is Phoenix BISO, it is meaningless to check the "55, AA" mark DE in the boot sector. It may be that there is no self-check.
Detailed explanation of the board diagnostic card code (contrast table) 2008-02-17 20:08 must read the table lookup:
1. There are three situations for special codes "00" and "ff" and other start codes:
①It appears after a series of other codes: "00" or "ff", the main board is ok.
②If there is no error in cmos, the non-serious fault will not affect the continuation of the bios self-check, and eventually "00" or "ff" will appear.
③If "00" or "ff" or other start codes appear as soon as the system is turned on and does not change, it means that the motherboard is not running.
2. This table is sorted according to the code value from small to large, and the code sequence in the card is not fixed.
3. The undefined codes are not listed in the table.
4. For different bios (commonly used ami, award, phoenix), the same code represents different meanings. Therefore, you should find out which type of bios the computer you are testing belongs to. You can refer to your computer manual, or from It can be viewed directly on the bios chip on the motherboard, or it can be viewed directly on the startup screen.
5. Only part of the code appears in the pci slot of a few motherboards, but the isa slot has a complete self-check code output. And it has been found that there are a few original motherboards with no code output in the isa slot, while the pci slot has a complete code output. Therefore, it is recommended that you change the dual-slot card to another slot to try it when the code is unsuccessful. . In addition, for the different PCI slots of the same motherboard, some slots have complete codes. For example, the dell810 motherboard has only one PCI slot close to the cpu. The complete code is displayed, and it changes to "00" or "ff", while other PCI slots go to After "38", the change will not continue.
6. The time required for the reset signal isa and pci are not necessarily synchronized, so it is possible that isa starts to output the code, but the reset light of pci does not turn off, so the pci code should stop at the start code.
Code comparison table
00. System configuration has been displayed; about to control INI19 boot loading.
01 Processor test 1, processor status verification, if the test fails, the loop is infinite. Testing of processor registers is about to begin, and non-maskable interrupts are about to be disabled. The CPU register test is in progress or failed.
02 Determine the type of diagnosis (normal or manufacturing). If the keyboard buffer contains data, it will be invalid. Disable non-maskable interrupts; start with a delay. CMOS write/read is in progress or fails.
03 Clear the 8042 keyboard controller and issue the TESTKBRD command (AAH) The power-on delay has been completed. The ROM BIOS check component is in progress or malfunctioning.
04 Reset the 8042 keyboard controller and verify TESTKBRD. Keyboard controller soft reset/power-on test. The test of the programmable interval timer is in progress or fails.
05 If manufacturing tests 1 to 5 are repeated continuously, 8042 control status can be obtained. Confirmed soft reset/power on; about to start ROM. DMA's initial preparations are in progress or fail.
06 Make initial preparations for the circuit chip, disable the video, parity, and DMA circuit chip, and clear the DMA circuit chip, all page registers and CMOS stop bytes. ROM has started to calculate the ROM BIOS check sum, and check whether the keyboard buffer is cleared. The DMA initial page register read/write test is in progress or fails.
07 Processor test 2, to verify the operation of the CPU registers. The ROM BIOS check sum is normal, the keyboard buffer has been cleared, and the BAT (Basic Assurance Test) command is issued to the keyboard. .
08 Make initial preparations for the CMOS timer, and update the timer normally. The BAT command has been issued to the keyboard, and the BAT command is about to be written. RAM update check is in progress or fails.
09 EPROM checks the sum and must be equal to zero to pass. Verify the basic assurance test of the keyboard, and then verify the keyboard command byte. The first 64K RAM test is underway.
0A makes initial preparations for the video interface. The keyboard command byte code is sent, and the command byte data is about to be written. The first 64K RAM chip or data line failed and shifted.
0B Test 8254 channel 0. Write the command byte of the keyboard controller, and the lock/unlock command of pins 23 and 24 will be issued soon. The first 64K RAM odd/even logic failed.
0C test 8254 channel 1. The keyboard controller pins 23 and 24 have been blocked/unlocked; the NOP command has been issued. The address line of the first 64K RAN is faulty.
0D 1. Check whether the CPU speed matches the system clock. 2. Check whether the programmed value of the control chip meets the initial setting. 3. The video channel test, if it fails, honk the horn. The NOP command has been processed; then the CMOS stop-on register is tested. Parity failure of the first 64K RAM
0E Test CMOS stop byte. CMOS stop and open register read/write test; CMOS check sum will be calculated. Initialize the input/output port address.
0F Test extended CMOS. The CMOS check sum has been calculated and written into the diagnostic byte; CMOS starts the initial preparation. .
10 Test DMA channel 0. CMOS has made initial preparations, and the CMOS status register is about to make initial preparations for the date and time. The 0th bit of the first 64K RAM is faulty.
11 Test DMA channel 1. The CMOS status register has been initially prepared, and the DMA and interrupt controller will be disabled. The first 64DK RAM is faulty.
12 Test the DMA page register. Disable DMA controller 1 and interrupt controllers 1 and 2; i.e. video display and make port B for initial preparation. The second bit of the first 64DK RAM is faulty.
13 Test the 8741 keyboard controller interface. The video display has been disabled, and port B has made initial preparations; circuit chip initialization/memory automatic detection will begin soon. The third bit of the first 64DK RAM is faulty.
14 Test the memory update trigger circuit. Circuit chip initialization/automatic detection of memory is over; 8254 timer test is about to begin. The 4th bit of the first 64DK RAM is faulty.
15 Test the initial 64K system memory. The second channel timer is half tested; the 8254 second channel timer is about to complete the test. The 5th bit of the first 64DK RAM is faulty.
16 Establish the interrupt vector table used by 8259. The second channel timer test is over; the 8254 first channel timer is about to complete the test. The 6th bit of the first 64DK RAM is faulty.
17 Adjust the video input/output work, and enable it if the video BIOS is installed. The first channel timer test is over; the 8254 channel 0 timer is about to complete the test. The 7th bit of the first 64DK RAM is faulty.
18 Test the video memory. If the optional video BIOS is installed, it can be bypassed. The 0th channel timer test is over; it will start to update the memory. The 8th bit of the first 64DK RAM is faulty.
19 Test the mask bit of the interrupt controller (8259) of the first channel. The memory update has started, and then the memory update will be completed. The 9th bit failure of the first 64DK RAM.
1A Test the mask bit of the interrupt controller (8259) of the second channel. The memory update circuit is being triggered, and the 15 microsecond on/off time is about to be checked. The 10th bit failure of the first 64DK RAM.
1B Test the CMOS battery level. Completed the 30 microsecond memory update time test; the basic 64K memory test will begin soon. The 11th bit failure of the first 64DK RAM.
1C Test CMOS to check the sum. . The 12th bit of the first 64DK RAM is faulty.
1D adjust CMOS configuration. . The 13th bit of the first 64DK RAM is faulty.
1E Determine the size of the system memory and compare it with the CMOS value. . The 14th bit of the first 64DK RAM is faulty.
1F test 64K memory up to 640K. . The 15th bit of the first 64DK RAM is faulty.
20 Measure the fixed 8259 interrupt bit. Start the basic 64K memory test; about to test the address line. The slave DMA register test is in progress or fails.
21 Maintain the non-maskable interrupt (NMI) bit (parity or input/output channel check). Passes the address line test; about to trigger parity. The main DMA register test is in progress or fails.
22 Test the interrupt function of 8259. End trigger parity; will start serial data read/write test. The main interrupt mask register test is in progress or fails.
23 Test protection mode 8086 virtual mode and 8086 page mode. The basic 64K serial data read/write test is normal; any adjustment before the interrupt vector initialization is about to start. The slave interrupt mask memory test is in progress or fails.
24 Measure the expansion memory of 1MB or more. Any adjustment before vector initialization is completed, and the initial preparation of interrupt vector is about to start. Set the ES segment address register registry to the high end of the memory.
25 Test all memories after the first 64K. The initial preparation of the interrupt vector is completed; the input/output port of the 8042 will be read out for the rotary intermittent start. Loading interrupt vector is in progress or fails.
26 Exceptions to test protection methods. Read the input/output port of 8042; about to make initial preparations for the rotary intermittent start of global data. Turn on the A20 address line; enable it to participate in addressing.
27 Determine the control or mask RAM of the cache memory. The initial preparation of all 1 data is over; then any initial preparation after the interrupt vector will be carried out. The keyboard controller test is in progress or fails.
28 Determine the control of the cache memory or the special 8042 keyboard controller. The initial preparation after the interrupt vector is completed; the monochrome mode is about to be adjusted. CMOS power failure/check sum calculation is in progress.
29. The monochrome mode has been set, and the color mode is about to be set. Checking the validity of the CMOS configuration is in progress.
2A makes the keyboard controller make initial preparations. The color mode has been set, and the parity will be triggered before the ROM test. Empty the 64K basic memory.
2B makes initial preparations for the disk drive and controller. Trigger parity end; about to control any adjustments required before the optional video ROM check. The screen memory test is in progress or fails.
2C Check the serial port and make initial preparations. Finish the processing before the video ROM control; about to check the optional video ROM and control it. The initial preparation of the screen is in progress or fails.
2D detects the parallel port and makes initial preparations. The optional video ROM control has been completed, and the control of any other processing after the video ROM reply control is about to be performed. The screen flyback test is in progress or fails.
2E makes initial preparations for the hard disk drive and controller. Recovery from the processing after the video ROM control; if EGA/VGA is not found, the display memory read/write test must be performed. Detection of video ROM is in progress.
2F detects the math co-processor"
Card pci express ugreen 30775
Card chuyển đổi pci to 1394
Card mạng tp-link tl-wn881nd
Card mạng tp-link tl-wn781nd
Card mạng tp-link tg-3468
Card mạng wifi asus pce-ax58bt
Card mạng tp-link tl-wn851nd
Card mạng tp-link archer t6e
Card mạng không dây usb totolink n160usm
Card mạng không dây tp-link archer tx3000e
Card mạng lan cho máy tính bàn tp-link tf-3239dl 1000002625
Kìm tuốt sợi quang cfs-2
Các mạng không dây các mạng không dây pci‑e cắm và chạy cho máy tính để bàn cho máy tính cho máy tính
Pcie card 2.5gbps gigabit network card 10/100/1000mbps rtl8125b rj45 ethernet network card pci-e network adapter
Các mạng không dây PCIe nhỏ Card mạng 5.0GHz Tần số ban nhạc cho Lenovo Thinkpad X230S
Cạc mạng Tuổi thọ dài PCIe adapter cho máy tính để bàn
L850 gl it4210 mô-đun 4g lte pc mạng bộ chuyển đổi thẻ đa băng tần tốc độ cao 450mbps downlink hỗ trợ lte fdd ổn định cho zbook 14u g5 cho probook 430 g5
Emerry 2 trong 1 card mạng usb sang rj45 usb sang 2.5g usb/type-c bộ chuyển đổi ethernet loại c chơi và chơi lái xe miễn phí usb sang cổng mạng dành cho máy tính xách tay
Pci-e adapter 4 bảo hiểm độc lập siêu mạnh mô-đun cấp nguồn pcie usb 3.0 thẻ cho nhà pci-e x1 x4 x8 x16 khe cắm
4g module 100mbps xách tay 4g lte module cho máy tính xách tay
867mbps card wi-fi bluetooth 4.2 ngff thẻ internet cho văn phòng
Ax210hmw wifi card+2xantenna wifi 6e mini pci-e ax210 802.11ax/ac 2.4g/5g/6ghz bt5.2 wireless adapter for laptop
Các mạng không dây Bộ chuyển đổi mạng tốc độ cao hơn cho truyền dữ liệu
Máy tính Card mạng Card mạng PCIe nhỏ cho máy tính để bàn cho máy tính xách tay
Combo 3 Đôi Tất Vớ nam cổ ngắn cao cấp trơn chất cotton mềm mại thoáng mát kháng khuẩn, chống mùi hôi OVT6 OPPAMAN
Bộ yếm suông túi nắp + áo thun tay dài cổ cao sọc ngang 170522
Vòng tay phong thủy Aquamarine Hải Lam Ngọc size 5mm mang lại bình yên, hợp mệnh Mộc, Thủy Cara Gem CR34
Bấm kim Mini, Bộ kim bấm nhỏ cầm tay, Thích hợp cho trường học và văn phòng
KhẩuTrang3Dmask
Đồ ngủ hình bò sữa dễ thương
Dầu xả bưởi cocoon cung cấp dưỡng chất & độ ẩm 310ml pomelo hair conditioner
Chân váy phối in lưng
Kẹp tóc dây ngọc Hàn quốc sang chảnh
Cốc điều hòa cho hoa lan – Phụ kiện thông minh – tiết kiệm thời gian chăm sóc
Hoa tai đính đá dáng vuông Hàn Quốc
Áo nỉ noel thêu hình lớn 🦋 áo thun sweater christmas họa tiết dáng rộng 4 màu 🦋 giá tốt
Phi tiêu đầu nam châm an toàn cho mọi lứa tuổi
Sục
Vay
Áo
Áo
Váy xuất
🎀🧧 nơ size nhỏ trang trí quả dưa tết 2025 - mâm cũ quả
Charm treo hoa bạc s925 thuần khiết hàng chính hãng


.u2470.d20160619.t155449.jpg)


